
Yes, you can unclog a kitchen sink with standing water, but you must take careful steps to avoid making the mess worse or damaging your pipes. Dealing with a sink full of stagnant water can be frustrating, but it’s a common plumbing issue. This guide will show you simple, effective methods for kitchen sink drain cleaning when water won’t go down. We aim to provide a clear standing water in sink solution using safe and tested techniques.
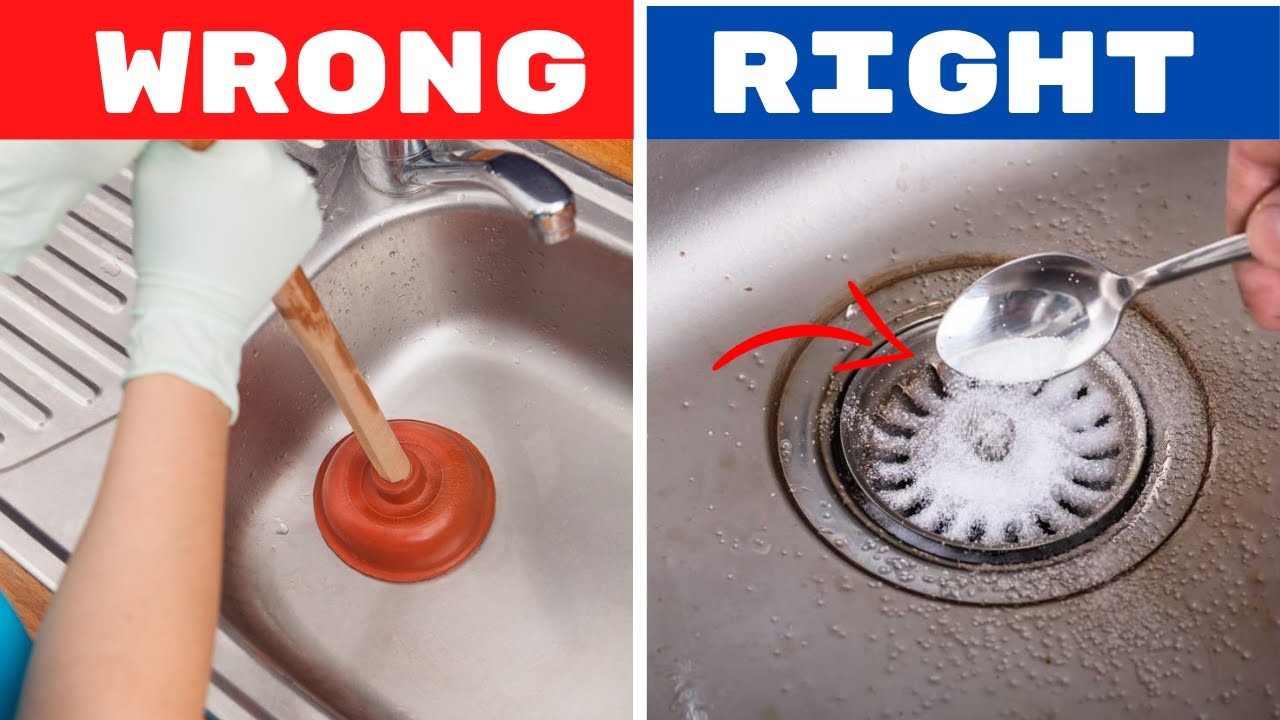
Image Source: i.ytimg.com
Safety First: Preparing for the Clog
Before you start any drain-clearing effort, safety is the top priority. Standing water means you cannot see where the blockage is. It also means harsh chemicals might bubble up unexpectedly.
Essential Safety Gear
Always wear protective gear. This simple step prevents skin and eye irritation.
- Rubber Gloves: Protect your hands from dirty water and cleaning agents.
- Safety Goggles: Keep splashes out of your eyes.
- Old Towels or Rags: These will soak up any overflow.
- A Small Container or Cup: You need this to bail out some water.
Removing Excess Water
You must lower the water level to access the drain opening properly. If the water is too high, plunging won’t work well.
- Scoop Out Water: Use a small cup, bowl, or bucket to carefully scoop out most of the standing water.
- Deposit Safely: Pour the scooped water down another drain (like a bathtub or bathroom sink) if those are working. If everything is blocked, put it in a bucket to discard later.
- Keep the Drain Visible: Stop bailing when the water level is just below the drain opening. This allows you to work directly on the clog site.
Initial Steps: Non-Invasive Methods for Resolving Standing Water in Sink Basin
Sometimes the clog is minor. Start with the gentlest methods first. These techniques are often the best way to unclog kitchen sink blockages caused by simple food debris or grease.
The Hot Water Flush (If Water is Only Warm)
If the water is just sluggish and not completely solid, heat might help melt grease.
- Boil Water: Heat a large pot of water on the stove. Do not use boiling water if you suspect the pipes are old PVC, as extreme heat can sometimes soften joints. Very hot tap water is safer initially.
- Pour Slowly: Pour the hot water slowly, directly down the drain opening. Wait five minutes.
- Check Flow: See if the water level drops even slightly. Repeat once more if you see any movement.
Using Baking Soda and Vinegar for Sink
This classic combination creates a fizzing action that can break up softer obstructions. It’s safe for nearly all pipes.
- Dry the Area: Wipe away any remaining surface water near the drain opening.
- Add Baking Soda: Pour about half a cup of baking soda directly into the drain hole. Use a spoon to push it down if necessary.
- Add Vinegar: Pour one cup of white vinegar over the baking soda. It will foam immediately.
- Cover the Drain: Quickly cover the drain opening with a stopper or a wet cloth. This forces the chemical reaction downward toward the clog, not up into the sink.
- Wait: Let this fizzing action work for at least 30 minutes. Longer is often better when dealing with standing water.
- Flush: Pour a kettle of very hot (but not boiling) water down the drain to rinse away the loosened debris.
Mechanical Force: When Gentle Methods Fail
If the baking soda and vinegar do not clear the blockage, you need mechanical force. This involves methods like plunging a clogged kitchen sink or using specialized tools.
Plunging a Clogged Kitchen Sink
A flange plunger, designed for toilets, is not ideal here. You need a cup plunger, which creates a tight seal over flat surfaces like a sink basin.
Steps for Effective Plunging:
- Ensure Water Level: Make sure the drain opening is covered by at least an inch or two of water. This water creates the necessary suction pressure. If you bailed too much water out, add some back in.
- Seal the Overflow (If Applicable): Many kitchen sinks have a secondary opening near the top rim (an overflow drain). You must seal this completely with a wet rag or tape. If you skip this, the pressure you create will just escape through the overflow, making plunging useless.
- Position the Plunger: Place the cup plunger firmly over the main drain opening, ensuring a tight seal.
- First Push: Push down gently once to push out trapped air. If you push too hard initially, water might splash everywhere.
- Plunge Vigorously: Plunge straight up and down rapidly, keeping the seal intact. Do this about 10 to 15 times. The motion should be quick and forceful.
- Check for Movement: On the final pull, yank the plunger off the drain sharply. Listen for a gurgling sound or watch if the water level drops.
- Repeat if Necessary: If the water moves slightly, repeat the plunging process several times.
If plunging fails to move the water, the blockage is likely solid and lodged deeper. It’s time to move to tools designed for removing stubborn sink blockage.
Specialized Tools for Deep Blockages
When plungers fail, the clog is probably caused by roots, heavy grease buildup, or objects stuck far down the pipe. These situations require specialized tools for effective kitchen sink drain cleaning.
Using a Sink Auger for Blockage
A sink auger, also called a drain snake, is a flexible metal cable with a corkscrew tip. This tool allows you to physically break up or pull out the obstruction.
Procedure for Using a Sink Auger:
- Locate Access Point: For a kitchen sink, the easiest place to start is usually under the sink in the P-trap or the cleanout plug if one exists.
- Remove the P-Trap (Optional but Recommended): If you are comfortable, place a bucket underneath and unscrew the two slip nuts connecting the P-trap (the curved pipe under the sink). This gives you direct access to the pipe leading into the wall.
- Insert the Snake: If you cannot remove the P-trap, feed the tip of the auger into the visible drain opening.
- Feed the Cable: Push the cable down the pipe slowly while turning the handle clockwise. The turning action helps the tip bore through the blockage.
- Feel the Resistance: When you hit resistance, you have found the clog.
- Break or Grab: Continue turning the handle. If you feel the clog breaking up, push gently to clear it. If the clog feels soft (like grease), try to hook it with the tip and slowly pull the auger back out.
- Retrieve Debris: Be prepared for foul debris coming up the drain.
- Reassemble and Test: If you removed the P-trap, clean it out, put it back together securely, and run water to test the drainage.
This method is highly effective for removing stubborn sink blockage that simple plunging cannot address.
Considering Chemical Solutions (Use with Extreme Caution)
Chemical drain cleaners offer powerful results but come with risks. They generate heat and corrosive action. They should only be used after mechanical methods have failed, and never mix them with any other substance (like vinegar or bleach).
Chemical Drain Cleaner for Kitchen Sink Usage
Most chemical cleaners use strong caustic agents (like lye) or sulfuric acid.
When to Use Chemicals:
- When the clog is confirmed to be organic matter (grease, soap scum).
- When you cannot reach the clog with an auger.
Crucial Safety Warnings:
- Never use a chemical cleaner if you suspect you have already poured another cleaner, bleach, or ammonia down the drain. Mixing chemicals can release toxic gas.
- Ensure maximum ventilation. Open windows and run an exhaust fan.
- Wear all your safety gear (goggles and gloves are mandatory).
Application Steps:
- Read Directions: Follow the product label instructions exactly. Pouring too much or too little can cause problems.
- Pour Slowly: Pour the recommended amount directly down the drain.
- Wait Time: Allow the chemical to work for the specified time (usually 15–30 minutes). Do not leave it longer than directed, as strong acids can damage certain older pipes over time.
- Flush Thoroughly: Flush with copious amounts of cool water. Hot water might accelerate the reaction too quickly.
If the chemical cleaner fails, stop. Do not try another chemical. Continued application will only harm your plumbing system further. At this point, professional help is usually needed.
Addressing Different Types of Kitchen Sink Blockages
The cause of the blockage determines the best slow draining kitchen sink fix. Knowing what is likely stuck helps guide your effort.
Grease and Fat Buildup
Grease is the most common culprit in kitchen sinks. When hot grease cools down inside the pipes, it solidifies, trapping food particles.
| Method | Effectiveness Against Grease | Notes |
|---|---|---|
| Hot Water Flush | Low to Medium | Only works on very soft or recent grease clogs. |
| Baking Soda/Vinegar | Medium | The fizzing helps scrape the walls slightly. |
| Plunging | Medium | Can push the grease plug along, but might reform later. |
| Auger/Snake | High | Can break up thick layers or pull out soft globs. |
Food Scraps and Coffee Grounds
These items pack tightly, especially near the P-trap.
- Plunging is often effective here if done forcefully.
- An auger can easily snag and pull out packed debris.
Foreign Objects
Items like bottle caps, small toys, or excessive amounts of potato peels can cause total blockage.
- These require an auger with a grabbing hook or careful disassembly of the P-trap to retrieve manually.
When to Call a Professional Plumber
If you have tried plunging, using baking soda and vinegar, and running an auger without success, it is time to stop. Forcing the issue further can cause the pipe to burst under the floor or within the wall.
Call a Plumber If:
- Standing Water Persists: After using an auger, the water still doesn’t drain.
- Multiple Drains Are Affected: If your kitchen sink, garbage disposal, and a nearby bathroom sink are all slow, the clog is likely deep in the main sewer line, requiring professional equipment.
- Chemicals Failed: You used a chemical drain cleaner for kitchen sink that did not work. Professional hydro-jetting equipment is far more powerful and safer for the pipes when dealing with harsh chemical residue.
- You Smell Sewage: This often means the clog is past the trap and into the main line, causing gases to back up.
Preventative Maintenance for a Smooth Drain
The best way to deal with a standing water in sink solution is to prevent the problem entirely. Good habits keep your drains clear.
Daily Habits
- Scrape Plates: Always scrape all food scraps into the trash or compost bin before rinsing.
- Limit Grease: Never pour cooking oils, fats, or grease down the drain. Pour them into an old can and throw them in the trash once solidified.
- Use a Strainer: A fine-mesh sink strainer catches small food bits before they enter the pipe.
Weekly/Monthly Routine
Regular simple maintenance helps keep the buildup minimal, preventing a slow draining kitchen sink fix situation down the line.
- Hot Water Rinse: Once a week, run very hot water down the drain for several minutes to help melt any minor grease deposits.
- Baking Soda and Vinegar Maintenance: Run a small maintenance dose of baking soda (1/4 cup) and vinegar (1/2 cup) down the drain once a month. Let it sit for 15 minutes, then flush with hot water. This acts as a gentle cleanser.
Frequently Asked Questions (FAQ)
Q: Can I use boiling water if I have PVC pipes?
A: It is generally safer to use very hot water from the tap rather than rolling boiling water, especially if your PVC pipes are older or the fittings are weak. True boiling water can sometimes soften PVC joints, leading to leaks under your sink.
Q: Why does my kitchen sink drain slowly even after plunging?
A: A slow draining kitchen sink fix is needed because plunging was not strong enough. This usually means the blockage is solid, greasy, or lodged deep past the immediate pipe structure, requiring an auger or chemical treatment.
Q: Is it safe to use a chemical drain cleaner for kitchen sink if I use a garbage disposal?
A: Be very careful. Many garbage disposal manufacturers advise against strong chemical cleaners as the corrosive agents can sometimes damage the rubber components or seals inside the disposal unit itself. Use mechanical methods first.
Q: How deep does a sink auger typically reach?
A: Standard hand-crank sink augers are usually 15 to 25 feet long. This is more than enough to reach the main line blockage for most standard kitchen sink setups.
Q: What is the best way to unclog kitchen sink if I don’t have a plunger?
A: If you lack a plunger, your next best bet is the baking soda and vinegar treatment followed by a thorough hot water flush. If that fails, proceed directly to carefully using a sink auger for blockage access.